Insert Tags
INFO
Insert Tags is available in Typefi Orion for Microsoft Word v1.2 or later.
Insert Tags lets you mark up content in your document—wrapping text, paragraphs, and figures in structured XML tags that Orion uses during export. Insert Tags is located in the Tools group on the Orion ribbon.

Insert Tags includes three tag types: reference tags, figure tags, and Specific Use. Your administrator can configure custom tags in Typefi Orion Compass v1.1 or later. See Manage Insert Tags for details.
Add a tag
How you apply a tag depends on what it does. Some tags wrap around selected text (for example, reference tags and Inline Graphic Alt-Text). All other tags insert at the cursor position, marking a point in the document.
To wrap content
- Select the text you want to tag.
- Click Insert Tags in the Tools group on the Orion ribbon.
- Choose a tag from the pop-up menu to wrap the selected content.

To insert a tag at the cursor position
- Place your cursor where you want to insert the tag.
- Click Insert Tags in the Tools group on the Orion ribbon.
- Choose a tag from the pop-up menu to insert an empty tag at the cursor position.
- If the tag requires a value, enter it inside the tag (for example, the filename for a Graphic tag or
centredfor a Specific Use tag).

Update a tag
You can change an existing tag without removing and reinserting it, for example, to correct a reference type assigned by SmartReferences.
To update an existing tag:
- Place your cursor inside the tag.
- Click Insert Tags in the Tools group on the Orion ribbon.
- Choose a different tag from the pop-up menu.
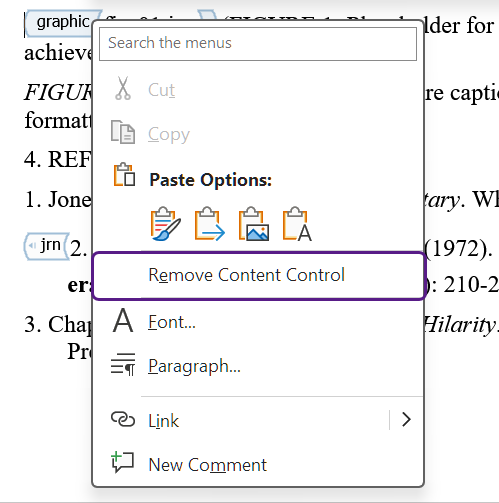
Remove a tag
To remove a tag:
- Right-click the tag.
- Choose Remove Content Control from the contextual menu.
Reference tags
Reference tags help you identify the publication type of each entry in your reference list—for example, whether a source is a journal article, a book, or a thesis.
SmartReferences applies tags automatically. Use Insert Tags manually to correct a wrong tag, or tag a reference that was not processed.
The default reference tags are:
- Book Reference
- Conference Reference
- Edited Book Reference
- Electronic Reference
- Journal Reference
- Data Reference
- Legal Reference
- Other Reference
- Preprint
- Thesis Reference
- Standard Reference
- Unknown Reference
Correct a reference tag
- Place the cursor inside the tag.
- Click Insert Tags, and choose the correct reference type.
Apply a reference tag manually
- Select the entire reference entry.
- Click Insert Tags, and choose the appropriate reference tag.
Figure tags
Graphic
By default, Orion auto-generates figure filenames during XML export. Use the Graphic tag to assign a specific filename instead (for example, if the same figure appears in multiple chapters, you might want to use a consistent filename across all instances).
To apply a Graphic tag:
- Place your cursor at the end of the figure caption paragraph.
- Click Insert Tags and choose Graphic.
- Enter the filename inside the tag (for example,
fig-01.jpg).
Inline Graphic Alt-Text
Use the Inline Graphic Alt-Text tag to add alternative text to images placed inline in the text (images without a figure number or caption).
To apply an Inline Graphic Alt-Text tag:
- Select the alt text for the image.
- Click Insert Tags and choose Inline Graphic Alt-Text.
Figure placement
Use the Anchor, Float, or Landscape tags to mark a figure's intended placement or orientation in the XML.
To apply a figure placement tag:
- Place your cursor at the end of the figure caption paragraph.
- Click Insert Tags and choose the appropriate tag.
Specific Use
Use Specific Use to pass a custom instruction to the export process for a specific element. Valid values depend on your publication's export configuration.
To apply a Specific Use tag:
- Place your cursor at the relevant location in your document.
- Click Insert Tags and choose Specific Use.
- Enter the value inside the tag.